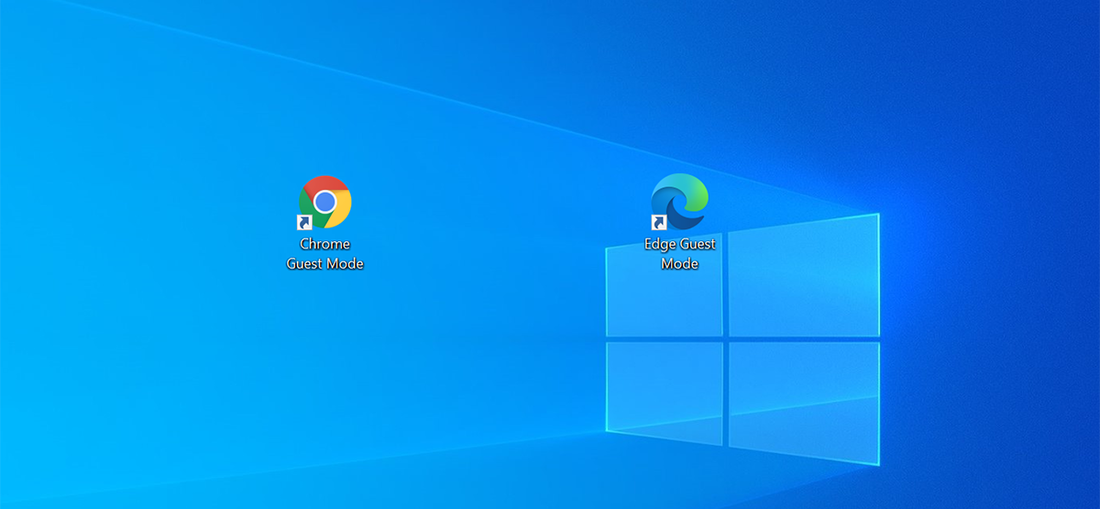
 Chrome and Edge both offer a guest mode that keeps your browsing isolated from your main profiles. If you access guest mode too frequently, you can add its shortcut to your Windows desktop. This makes opening guest mode even easier. What Is Guest Mode in Chrome and Edge? Guest mode in Google Chrome and Microsoft Edge is basically a guest profile for your browsing sessions. When you use guest mode, the browser doesn’t load your main browser profiles (the ones that have your browsing history, browser personalizations, and so on). 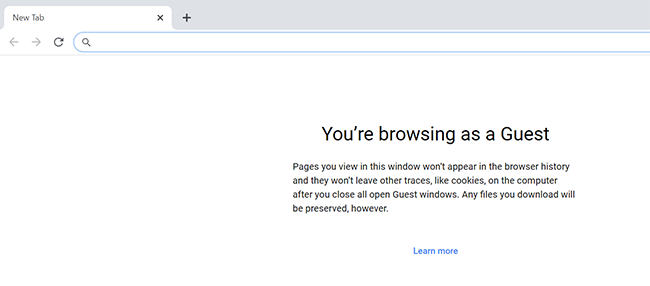 When you leave this mode, all the browsing you did in it is deleted from your history. Your downloaded files list is also cleared, although the files themselves are kept. If you have people at your home or office who need to use your browser, you can offer them guest mode access so that their browsing history doesn’t affect yours. Create a Guest Mode Shortcut for Google Chrome Usually, you would click your profile icon on Chrome’s toolbar and select “Guest” to enter guest mode in Chrome, but you can eliminate these clicks by creating a desktop shortcut that directly opens guest mode in Chrome. To add this shortcut, open the Windows Start menu and search for “Google Chrome.” Right-click the browser in the list and select “Open file location.” 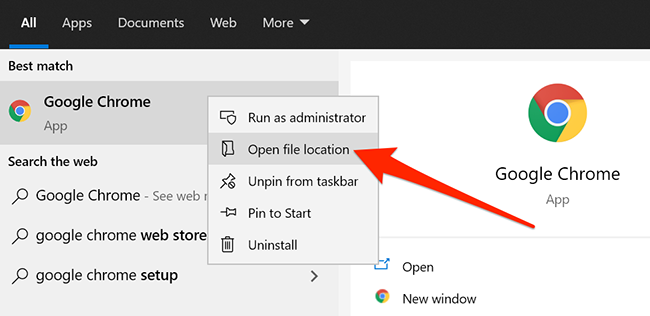 In the File Explorer window, right-click the “Chrome” shortcut and select “Open file location.” You’re looking for Chrome’s executable (chrome.exe) file. Once you see “chrome.exe”, right-click it and select Send to > Desktop (create shortcut). 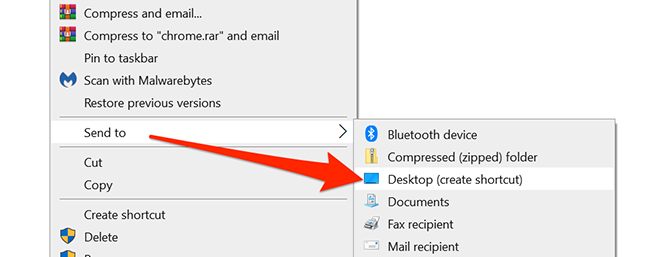 Right-click the newly added “Chrome” shortcut on your desktop and select “Properties.” 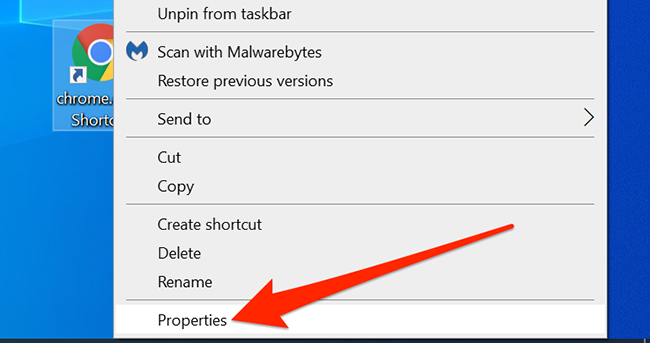 In the Properties window, click the “Shortcut” tab. Put your cursor after all the text in the “Target” field and press Spacebar. Now type the following: 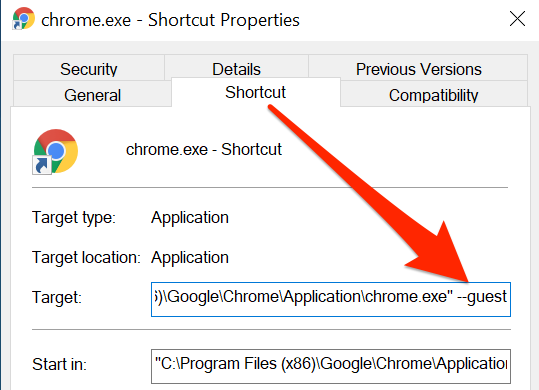 Click “Apply” and then “OK” at the bottom to save your changes. Your guest mode shortcut is now ready. You should rename this shortcut so that you can easily identify it. Right-click the shortcut and select “Rename.” Enter a meaningful name like “Chrome Guest Mode,” then hit “Enter.” 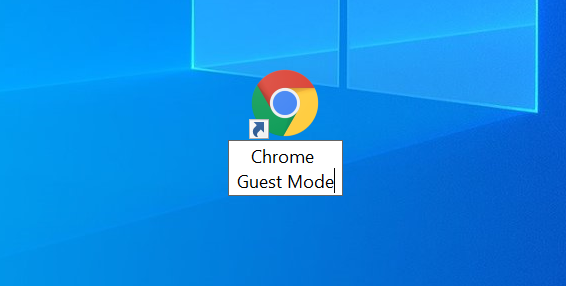 Make a Guest Mode Shortcut for Microsoft Edge The process of creating a guest mode shortcut for Edge is pretty much the same as it is for Chrome. To start, open the Start menu and search for “Microsoft Edge.” Right-click the browser in the results and select “Open file location.” 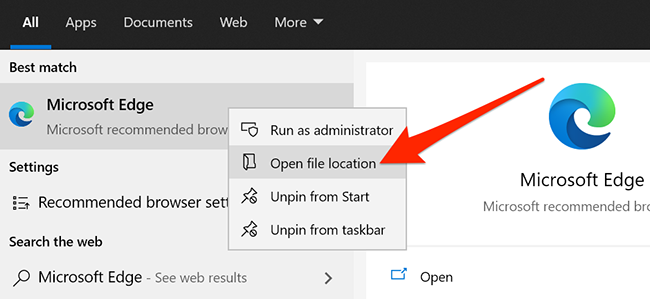 You’ll now see Edge’s shortcut in a File Explorer window. Right-click this shortcut and select “Open file location” again. When you find “msedge.exe”, right-click it and choose Send to > Desktop (create shortcut). This adds Edge’s shortcut to your desktop. 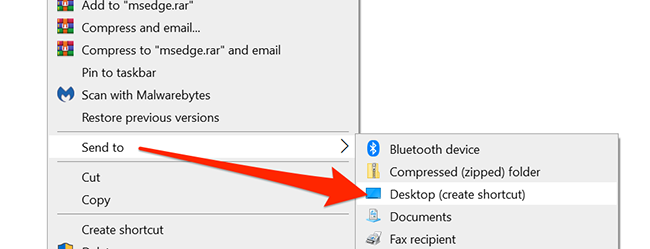 Go to your desktop, right-click the “Edge” shortcut, and select “Properties.” 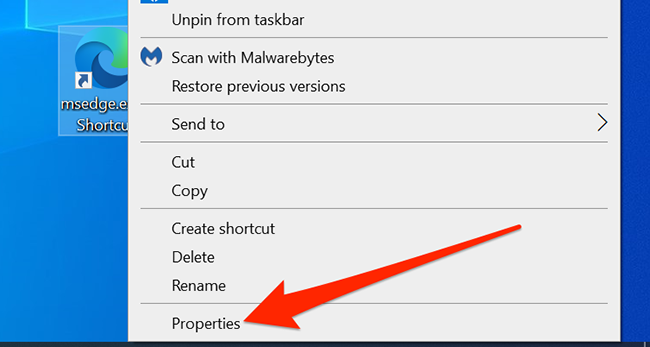 Click the “Shortcut” tab in the Properties window. Place your cursor after the text in the “Target” field and press Spacebar. Add the following text after the space: 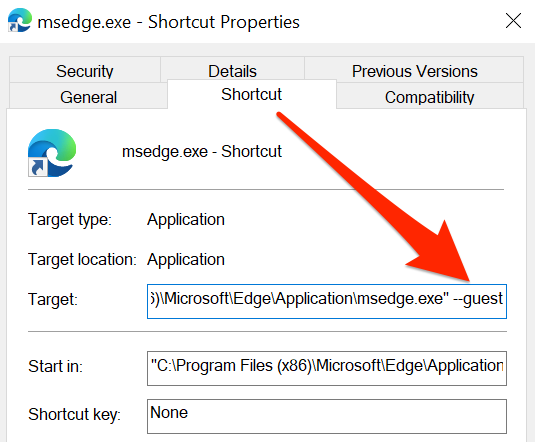 Click “Apply,” and then click “OK” to save your changes. You’re all set.
0 Comments
With Windows 10's File History, you can automatically back up important files and documents to an external location and recover them in a pinch.  If a critical and irreplaceable file you were viewing the other day is lost or will no longer open, you would be in trouble if not for Windows 10’s File History feature. It can automatically save specific file folders to a backup device, thus allowing you to recover a previous version of a file should it go missing or become corrupted and unusable. Here’s how to set up File History and save your important documents, photos, and files before something goes wrong. Set Up Storage Device First, make sure you have a viable drive connected to or accessible from your PC. This could be a simple flash drive, an external drive, or a network location on a Network Attached Storage drive. If your drive plugs into the computer, make sure to connect it before trying anything else. For a wireless network drive, it must be connected to power and properly mapped. 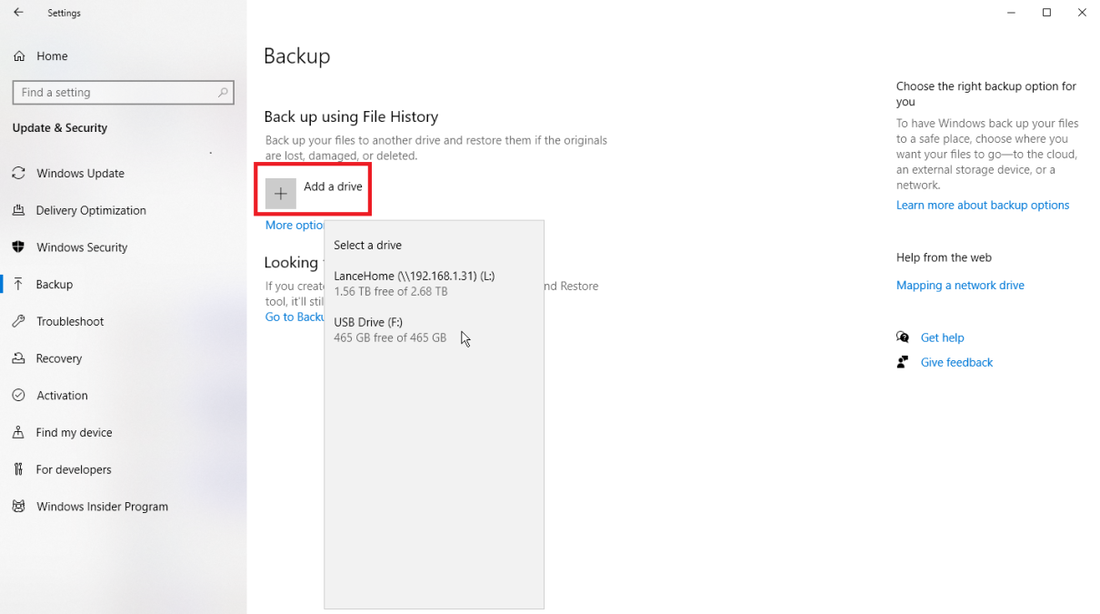 Set Up File History In Windows 10, click the Start button, go to Settings > Update & Security > Backup, then click Add a drive under the Back up using File History section. Assuming you've connected a workable backup device, Windows displays a list of all such locales. Select the location you wish to use for your backups. 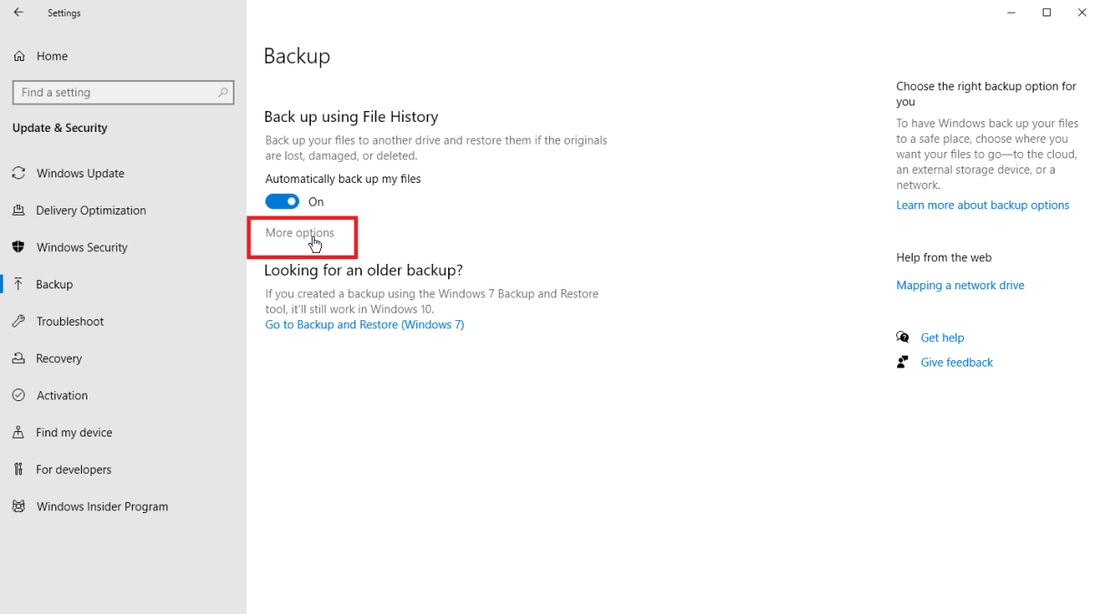 File History is now enabled, though it's not yet backing up any files. Click More options to set up a few parameters. At the top of the File History window, click the Back up my files drop-down menu and choose how frequently you wish to back up your files, from every 10 minutes to Daily. 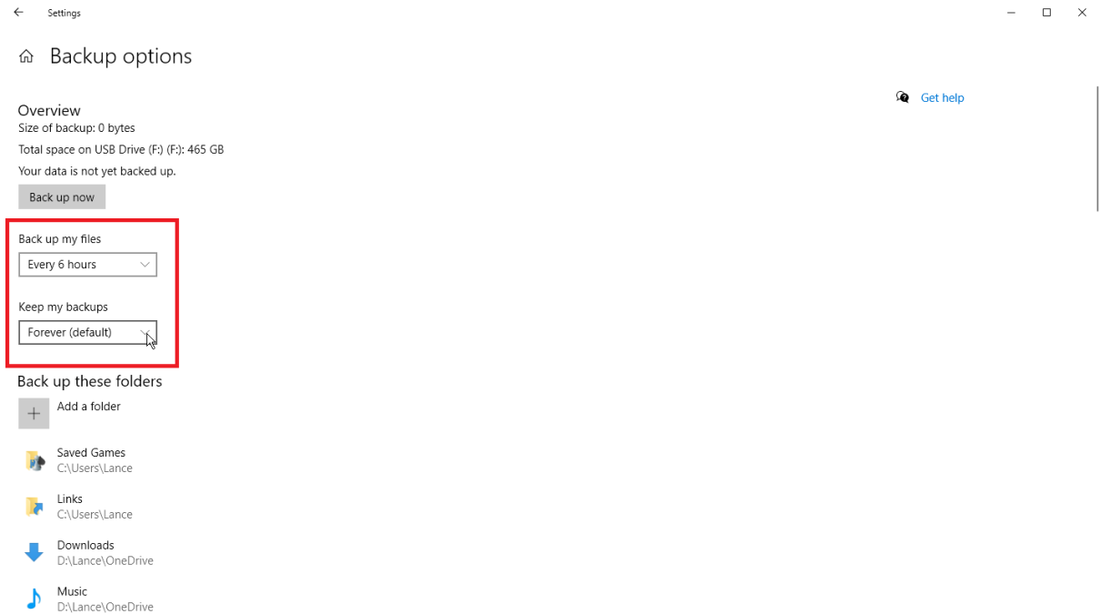 Then click the Keep my backups drop-down menu, and select how long you want to retain your backed up files—anything from Until space is needed to Forever. Manage Folders 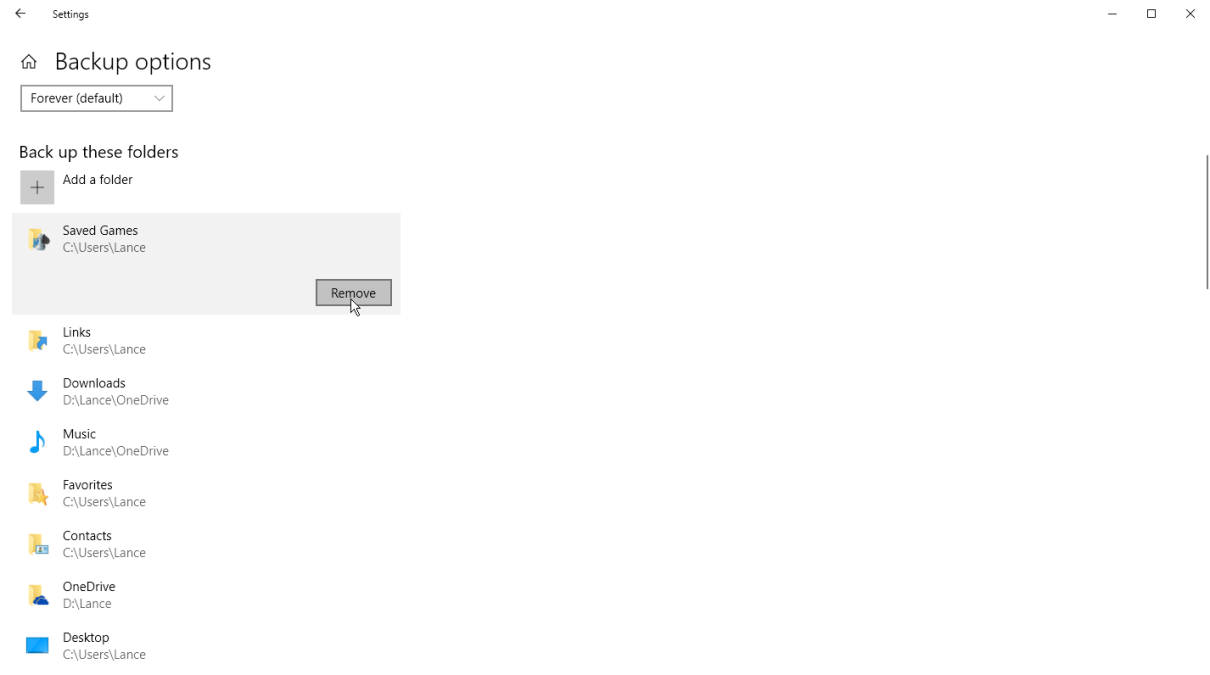 By default, File history will begin backing up a selection of default folders, including Desktop, Downloads, Music, and more. However, you can also remove some of these folders from the mix. Scroll down the Backup options window and review the list of default folders already included in the backup. Select any folder you don't wish to back up and then click the Remove button to exclude it. 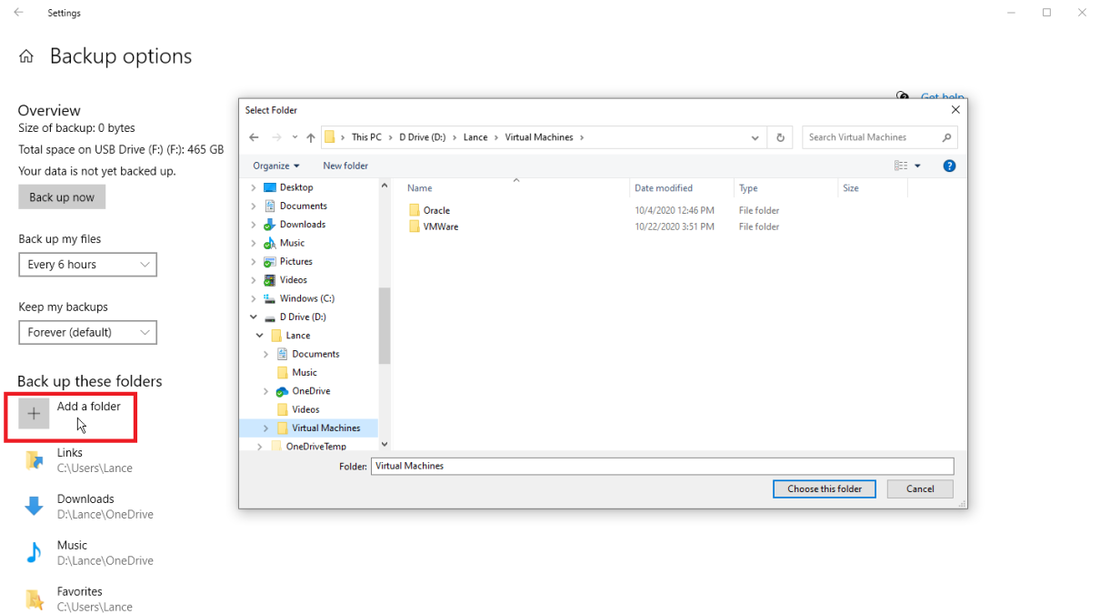 You can add your own custom folders by clicking the Add a folder button under the Back up these folders heading. From File Explorer, select any folders not included in the backup that you wish to add. 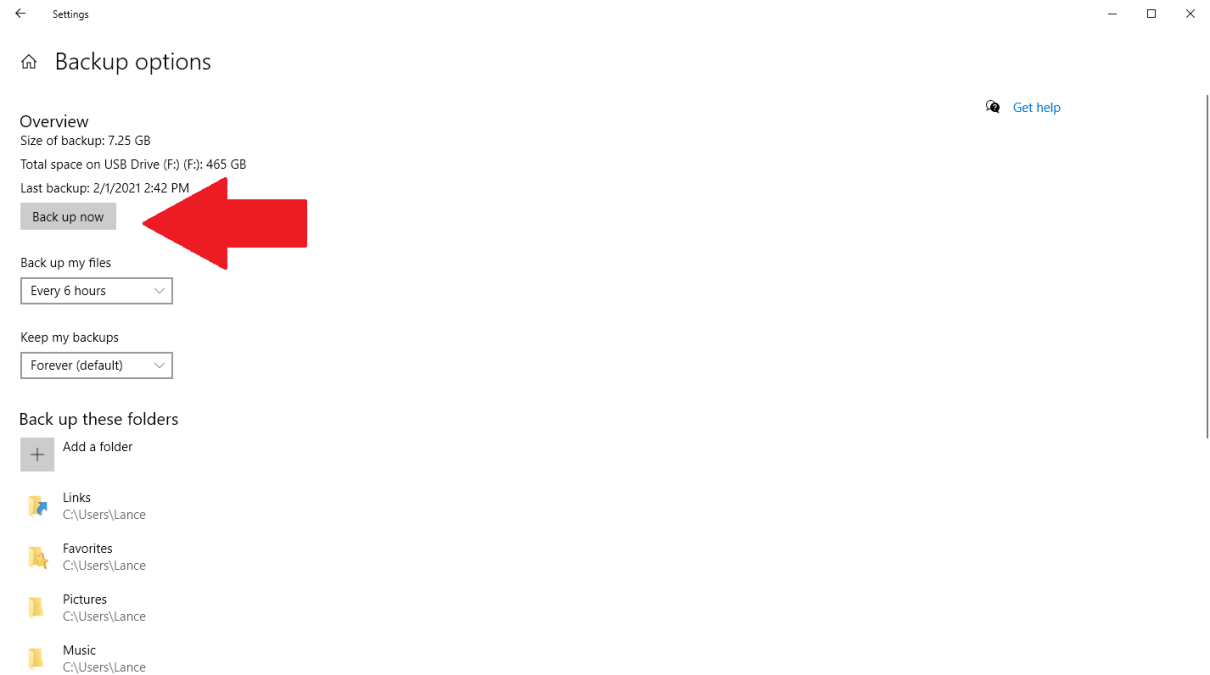 Once you’re all set, click the Back up now button at the top of the screen and Windows will start backing up these files included in your backup set. After your backup has finished, Windows displays the total size and the date and time of the backup. Restore Files 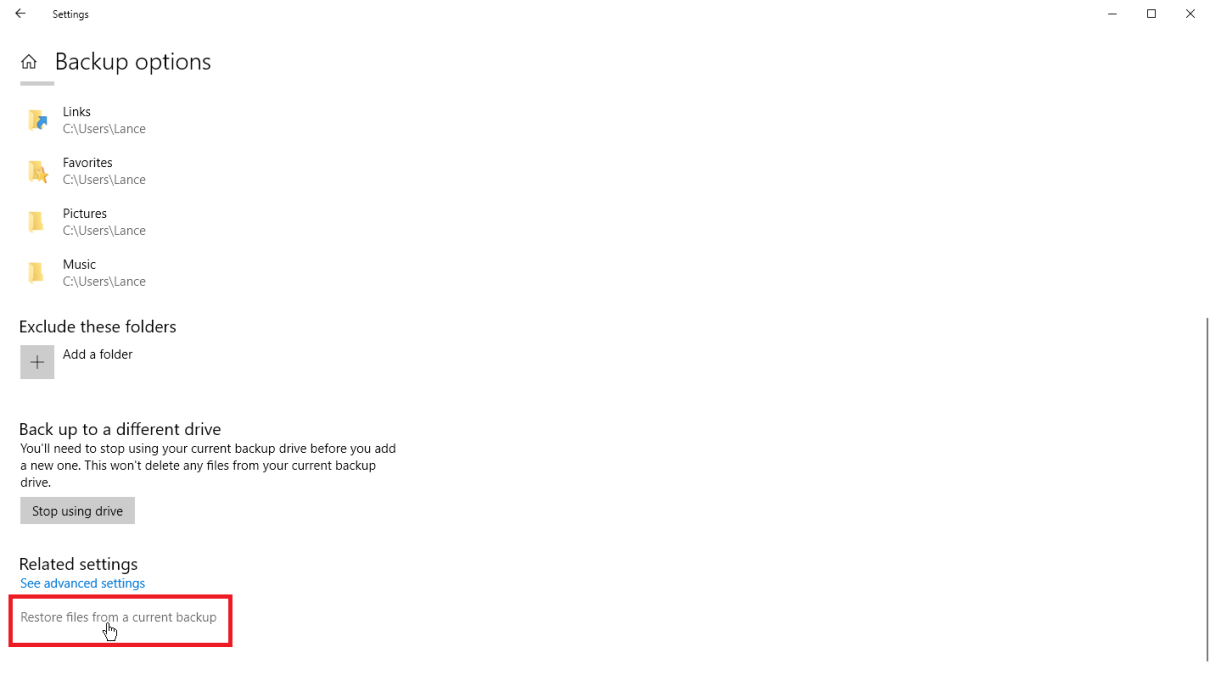 Now, if that vitally important file goes missing or has become corrupted, you can use your File History backup to restore it. Go back to Settings > Update & Security > Backup and click More options again. Scroll down to the bottom of the File History window and click the Restore files from a current backup link. 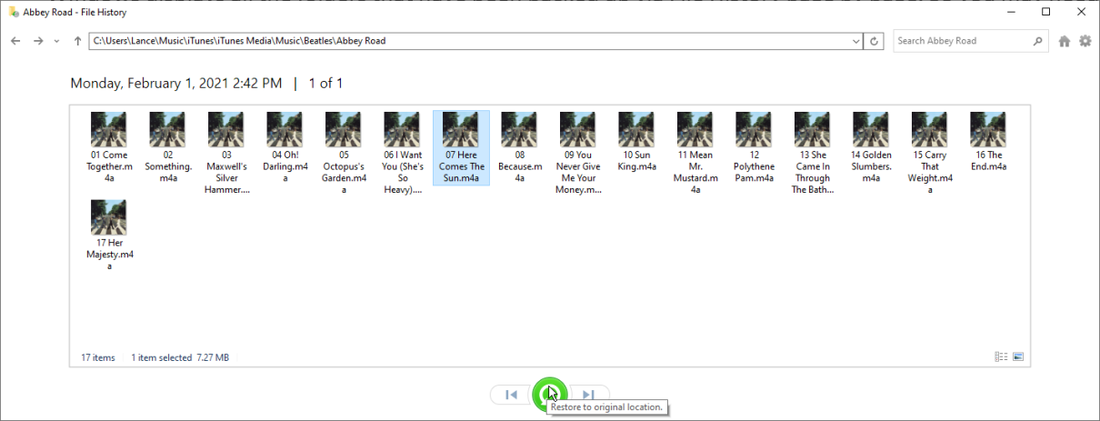 Windows displays all the folders that have been backed up by File History. You may need to scroll through a few pages in order to find the file you seek. Double-click the folder you want, then double-click the file to view it. If it's the file you need, click the green button with the white arrow at the bottom of the window to restore the file. 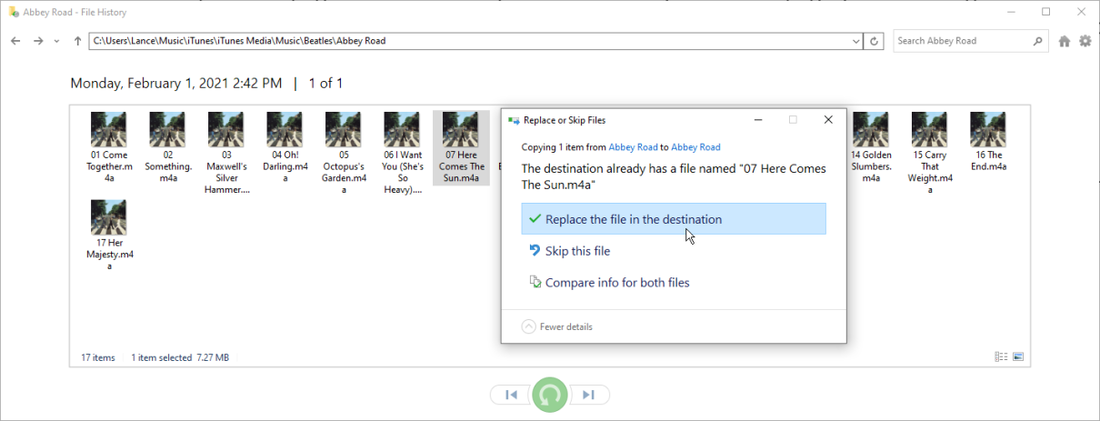 If the file still exists in its original location, Windows asks if you want to replace it, skip it, or compare both files. If the original file is gone, Windows automatically restores it to its previous location. Thanks to Lance Whitney from PCMag
 As your business grows, the amount of data that it needs to store and manage also grows. Storing this data on loose hard drives and individual workstations will no longer cut it: Your team needs ready data access, protection from loss, and capacity for future growth. The easiest way to provide all three quickly and easily is network attached storage (NAS). No matter where you’re starting, the number of choices and features NAS systems offer today are overwhelming, especially when you’re trying to buy something that will work now and in the future. This post aims to make your process a little easier. The following content will help you:
 How Can NAS Benefit Your Business? There are multiple benefits that a NAS system can provide to users on your network, but we’ll recap a few of the key advantages here.
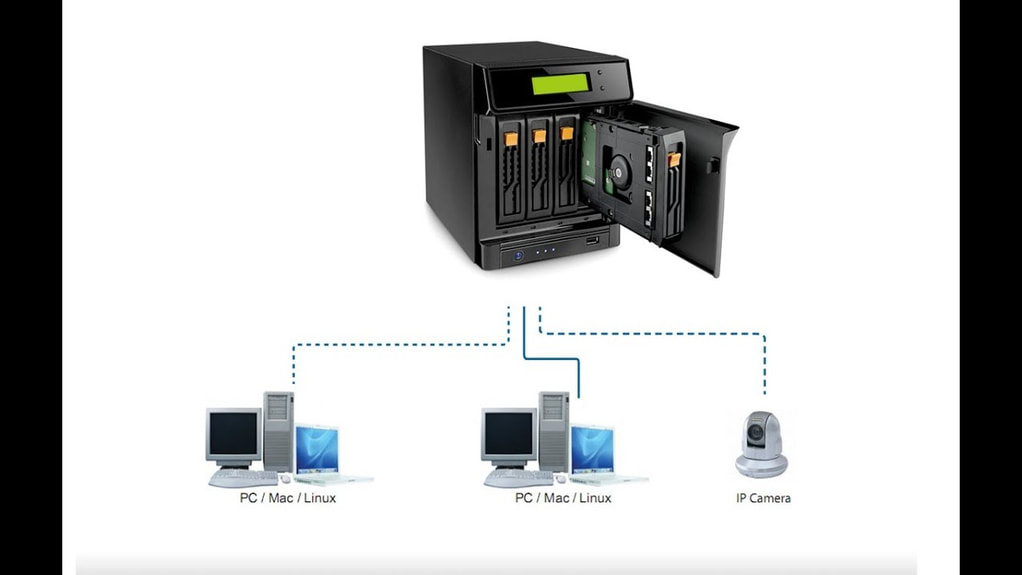
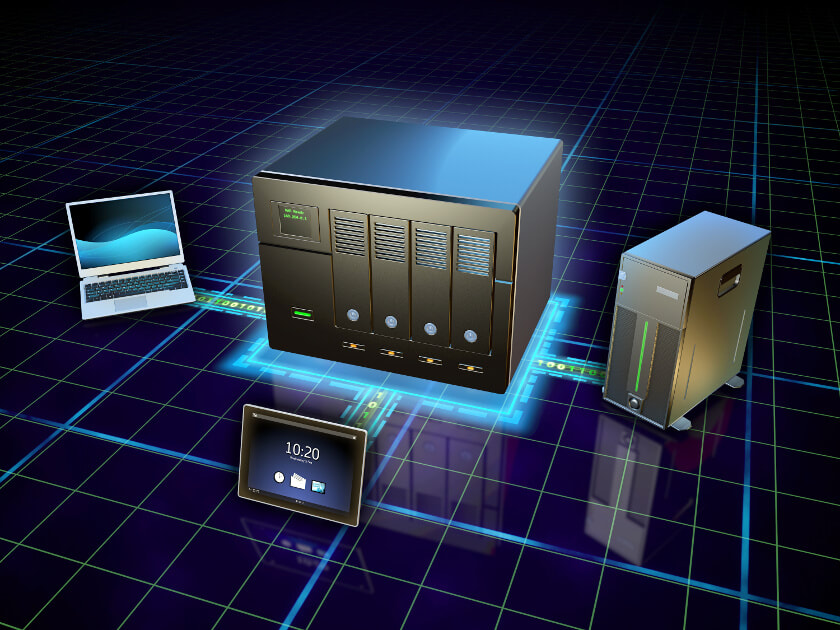 How do you evaluate the differences between different NAS vendors? Or even within a single company’s product line? We’re here to help. This tour of the major components of a NAS system will help you to develop a tick list for the sizing and features of a system that will fit your needs. Choosing a NAS: The Components How your NAS performs is dictated by the components that make up the system, and capability of future upgrades. Let’s walk through the different options. NAS Storage Capacity: How Many Bays Do You Need? One of the first ways to distinguish between different NAS systems is the number of drive bays a given system offers, as this determines how many disks the system can hold. Generally speaking, the larger the number of drive bays, the more storage you can provide to your users and the more flexibility you have around protecting your data from disk failure. In a NAS system, storage is defined by the number of drives, the shared volume they create, and their striping scheme (e.g. RAID 0, 1, 5, 6, etc.). For example, one drive gives no additional performance or protection. Two drives allows the option of simple mirroring. Mirroring is also referred to as RAID 1, when one volume is built from two drives, allowing for the failure of one of those drives without data loss. Two drives also allows for striping—referred to as RAID 0—when one volume is “stretched” across two drives, making a single, larger drive that also gives some performance improvement, but increases risk because the loss of one drive means that the entire volume will be unavailable. 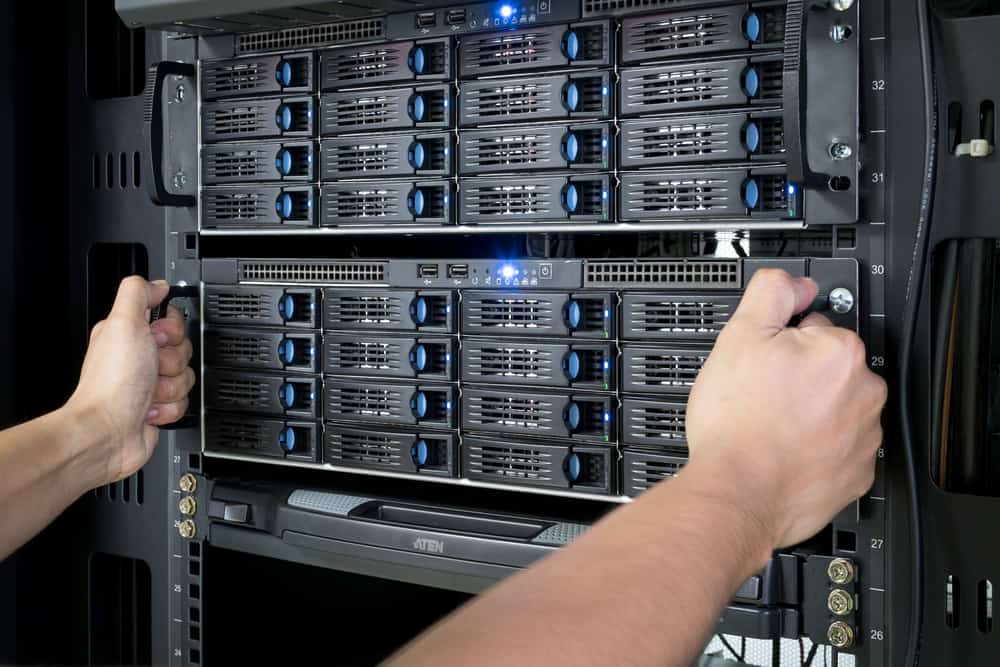 Three drives is the minimum for RAID 5, which can survive the loss of one drive, though four drives is a more common NAS system configuration. Five drives allow for RAID 6, which can survive the loss of two drives. Six to eight drives are very common NAS configurations that allow more storage, space, performance, and even drive sparing—the ability to designate a stand-by drive to immediately rebuild a failed drive. Many believe that, if you’re in the market for a NAS system with multiple bays, you should opt for capacity that allows for RAID 6 if possible. RAID 6 can survive the loss of two drives, and delivers performance nearly equal to RAID 5 with better protection. It’s understandable to think: Why do I need to prepare in case two drives fail? Well, when a drive fails and you replace it with a fresh drive, the rebuilding process to restore that drive’s data and parity information can take a long time. Though it’s rare, it’s possible to have another drive fail during the rebuilding process. In that scenario, if you have RAID 6 you’re likely going to be okay. If you have RAID 5, you may have just lost data. When buying a NAS system with drives provided:
If you choose to buy drives separately from your NAS:
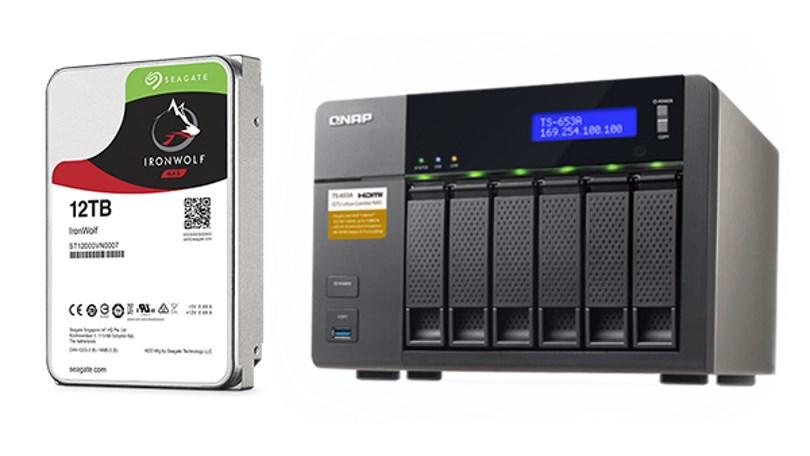 Selecting Drive Capacity for the NAS: What Size of Drives Should You Buy? You can quickly estimate how much storage you’ll need by adding up the hard drives and external drives of all the systems you’ll be backing up in your office, adding the amount of shared storage you’ll want to provide to your users, and factor in any growing demand you project for shared storage. If you have any historical data under management from previous years, you can calculate a simple growth rate. But, include a buffer as data growth accelerates every year. Generally speaking, price out systems at two or four times the size of your existing data capacity. Let’s say that your hard drives and external drives to back up, and any additional shared storage you’d like to provide your users, add up to 20TB. Double that size to get 40TB to account for growth, then divide by a common hard drive size such as 10TB. With that in mind, you can start shopping for four bay systems and larger. If your budget allows, opting for larger drives and more drive bays will give you more storage overhead that you’ll surely grow into over time. Factor in, however, that if you go too big, you’re paying for unused storage space for a longer period of time. And if you use GAAP accounting, you’ll need to capitalize that investment over the same time window as a smaller NAS system which will hit your bottom line on an annual basis. If your cash budget is tight you can always purchase a NAS system with more bays but smaller drives, which will significantly reduce your upfront pricing. You can then replace those drives in the future with larger ones when you need them. Hard drive prices generally fall over time, so they will likely be less expensive in the future. You’ll end up purchasing two sets of drives over time, which will be less cash-intensive at the outset, but likely more expensive in the long run. Similarly, you can partially fill the drive bays. If you want to get an eight bay system, but only have the budget for six drives, just add the other drives later. One of the best parts of NAS systems is the flexibility they allow you for right-sizing your shared storage approach. Estimate how much storage you’ll need, add the amount of shared storage you’ll want to provide to your users, and factor in growing demand for shared storage—then balance long term growth potential against cash flow. 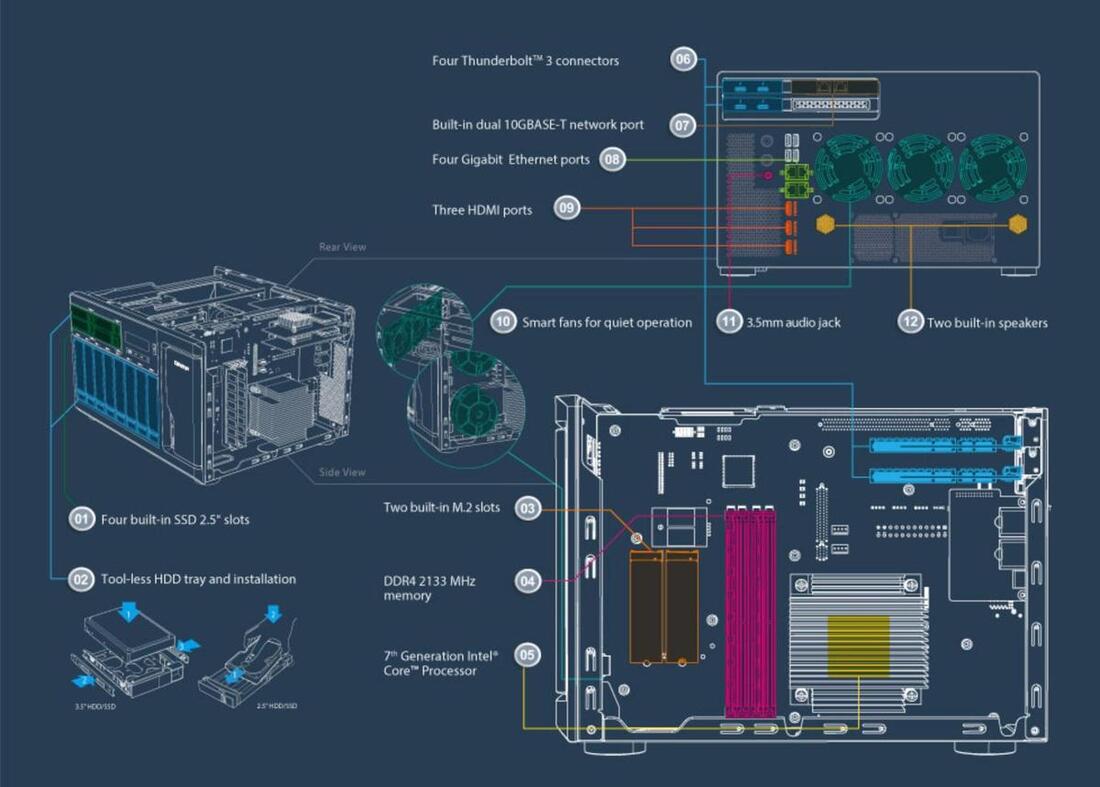 Processor, Controllers, and Memory: What Performance Levels Do You Require? Is it better to have big onboard processors or controllers? Smaller, embedded chips common in smaller NAS systems provide basic functionality, but might bog down when serving many users or crunching through deduplication and encryption tasks, which are options with many backup solutions. Larger NAS systems typically stored in IT data center racks usually offer multiple storage controllers that can deliver the fastest performance and even failover capability.
So if you’re just looking for basic storage expansion, the entry-level systems with more modest, basic chips will likely suit you just fine. If deduplication, encryption, sync, and other functions many NAS systems offer as optional tools are part of your future workflow, this is one area where you shouldn’t cut corners. If you have the option to expand the system memory, this can be an easy performance upgrade. Generally, the higher the ratio of memory to drives will benefit the performance of reading and writing to disk and the speed of on-board applications. Entry-level NAS systems provide good basic functionality, but you should ensure your components are up to the challenge if you plan to make heavy use of deduplication, encryption, compression, and other functions. 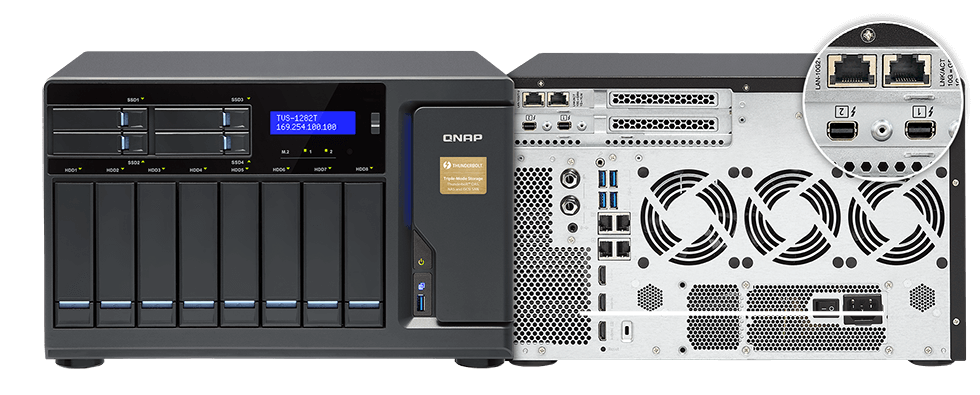 Network and Connections: What Capacity for Speed Do You Need? A basic NAS will have a Gigabit Ethernet connection, which you will often find listed as 1GigE. This throughput of 1 Gb/s in network speeds is equivalent to 125 MB/s coming from your storage system. That means that the NAS system must fit storage service to all users within that limitation, which is usually not an issue when serving only a few users. Many systems offer expansion ports inside, allowing you to purchase a 10GigE network card later to upgrade your NAS. Some NAS vendors offer 2.5 Gb/s, or 5 Gb/s connections on their systems—these will give you more performance than 1GigE connections, but usually require that you get a compatible network switch, and possibly, USB adapters or expansion cards for every system that will connect to that NAS via the switch. If your office is already wired for 10GigE, make sure your NAS is also 10GigE. Otherwise, the more network ports in the back of the system, the better. If you aren’t ready to get a 10GigE capable system now, but you think you might be in the future, select a system that has expansion capability. Some systems provide another option of Thunderbolt connections in addition to Ethernet connections. These allow laptops and workstations with Thunderbolt ports to directly connect to the NAS and offer much higher bandwidth—up to 40GigE (5 GB/s)—and are good for systems that need to edit large files directly on the NAS, such as is often the case in video editing. If you’ll be directly connecting systems that need the fastest possible speeds, select a system with Thunderbolt ports, one per Thunderbolt-connected user. It’s best to have more network ports in the back of your system. Or, select a system with network expansion card capability. 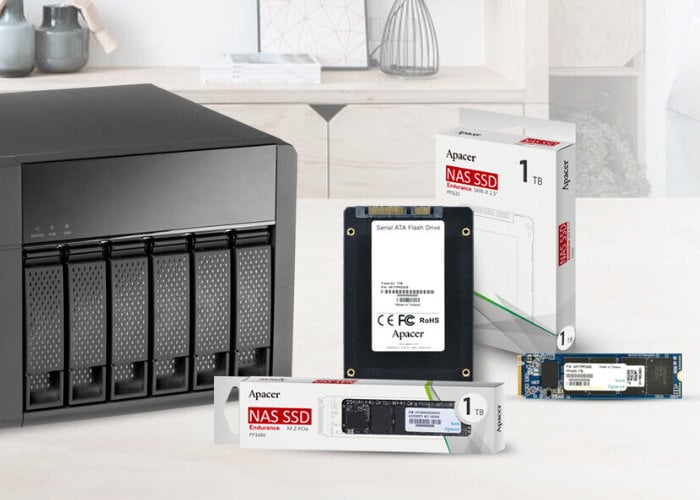 Caching and Hybrid Drive Features: How Fast Do You Need to Serve Files? Many of the higher-end NAS systems can complement standard 5.25” hard drives with higher performing, smaller form factor SSD or M.2 drives. These smaller, faster drives can dramatically improve the NAS file serving performance by caching files in most recent, or most frequently requested files. By combining these different types of drives, the NAS can deliver both improved file serving performance, and large capacity. As the number of users you support in each office grows, these capabilities will become more important as a relatively simple way to boost performance. Like we mentioned earlier, you can purchase a system with these slots unpopulated and add them in later. Combine different types of drives, like smaller form factor SSD or M.2 storage with 5.25” hard drives to gain improved file serving performance. Operating System: What Kind of Management Features Do You Require? Many of the higher-end NAS systems can complement standard 5.25” hard drives with higher performing, smaller form factor SSD or M.2 drives. These smaller, faster drives can dramatically improve the NAS file serving performance by caching files in most recent, or most frequently requested files. By combining these different types of drives, the NAS can deliver both improved file serving performance, and large capacity. As the number of users you support in each office grows, these capabilities will become more important as a relatively simple way to boost performance. Like we mentioned earlier, you can purchase a system with these slots unpopulated and add them in later. Combine different types of drives, like smaller form factor SSD or M.2 storage with 5.25” hard drives to gain improved file serving performance. Operating System: What Kind of Management Features Do You Require? The NAS operating systems of the major vendors generally provide the same services in an OS-like interface delivered via an on-board web server. By simply typing in your NAS’s IP address, you can sign in and manage your system’s settings, create and manage the storage volumes, set up groups of users on your network who have access, configure and monitor backup and sync tasks, and more. If there are specific user management features in your IT environment that you need, or want to test how the NAS OS works, you can test them by spinning up a demonstration virtual machine offered by some NAS vendors. You can test service configuration and get a feel for the interface and tools, but obviously as a virtual environment you won’t be able to manage hardware directly. Here are some options: The on-board NAS OS looks similar to a Mac or PC operating system to make it easy to navigate system setup and maintenance and allows you to manage settings, storage, and tasks. 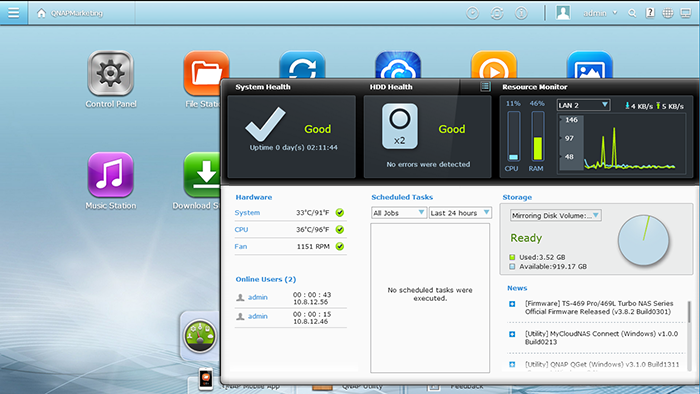 Solutions: What Added Services Do You Require? While the onboard processor and memory on your NAS are primarily for file service, backup, and sync tasks, you can also install other solutions directly onto it. For instance, QNAP and Synology—two popular NAS providers—have app stores accessible from their management software where you can select applications to download and install on your NAS. You might be interested in a backup and sync solution. However, beyond backup solutions, you’d benefit from installing mission-critical apps onto a dedicated system rather than on your NAS. For a small number of users, running applications directly on the NAS can be a good temporary use or a pathway to testing something out. But if the application becomes very busy, it could impact the other services of the NAS. Big picture, native apps on your NAS can be useful, but don’t overdo it. The main backup and sync apps from the major NAS vendors are excellent—give them a good test drive, but know that there are many excellent backup and sync solutions available as well. 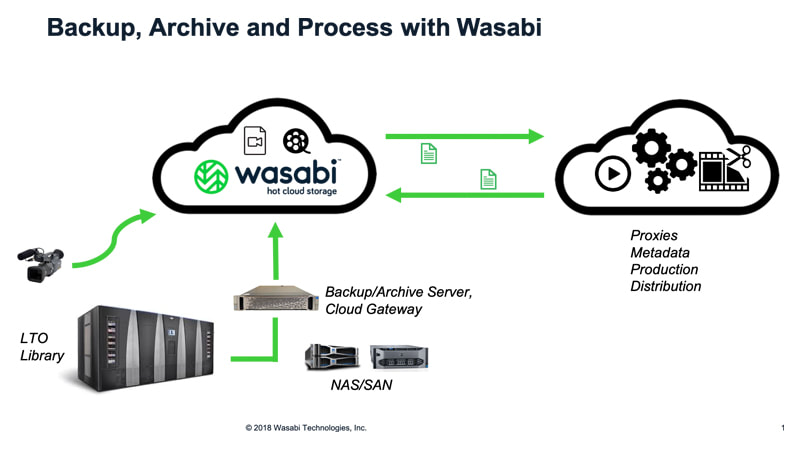 Why Adding Cloud Storage to Your NAS Offers Additional Benefits When you pair cloud storage with your NAS, you gain access to features that complement the security of your data and your ability to share files both locally and remotely. To start with, cloud storage provides off-site backup protection. This aligns your NAS setup with the industry standard for data protection: a 3-2-1 backup strategy—which ensures that you have three copies of your data, the source data and two backups—one of which is on your NAS, and the second copy of your data is protected off-site. And in the event of data loss, you can restore your systems directly from the cloud even if all the systems in your office are knocked out or destroyed. While data sent to the cloud is encrypted in-flight via SSL, you can also encrypt your backups so that they are only openable with your team’s encryption key. The cloud can also give you advanced storage options for your backup files like Write Once, Read Many (WORM) or immutability—making your data unchangeable for a defined period of time—or set custom data lifecycle rules at the bucket level to help match your ideal backup workflow. Additionally, cloud storage provides valuable access to your data and documents from your NAS through sync capabilities. In case anyone on your team needs to access a file when they are away from the office, or as is more common now, in case your entire team is working from home, they’ll be able to access the files that have been synced to the cloud through your NAS’s secure sync program. You can even sync across multiple locations using the cloud as a two-way sync to quickly replicate data across locations. For employees collaborating across great distances, this helps to ensure they’re not waiting on the internet to deliver critical files: They’re already on-site. Ready to Set Up Your NAS With Cloud Storage
To summarize, here are a few things to remember when shopping for a NAS system:
 Facebook allows search engines like Google to index your profile and publicly available information. But if you don’t want people to be able to look up your social profile outside of Facebook, you can choose to delist it. Here’s how. First, head over to Facebook’s website using your Windows 10, Mac, or Linux desktop browser and sign in to your account. Next, click the arrow in the top-right corner of the social network to reveal a dropdown menu, then select “Settings & Privacy.” 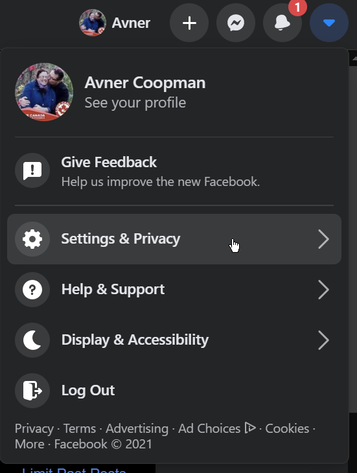 Navigate to “Settings.” 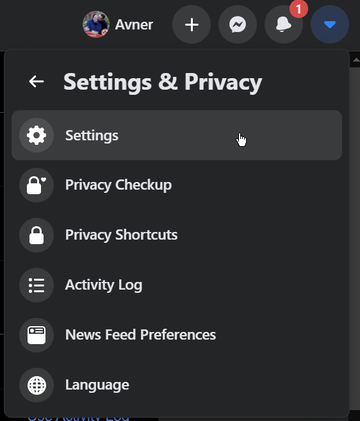 Select “Privacy” from the column on the left. Scroll down toward the bottom of the page, and under the “How people can find and contact you” section, you’ll find an option called “Do you want search engines outside of Facebook to link to your Profile?”  Click the blue “Edit” button located beside that option. Uncheck the box next to “Allow search engines outside of Facebook to link to your Profile.” 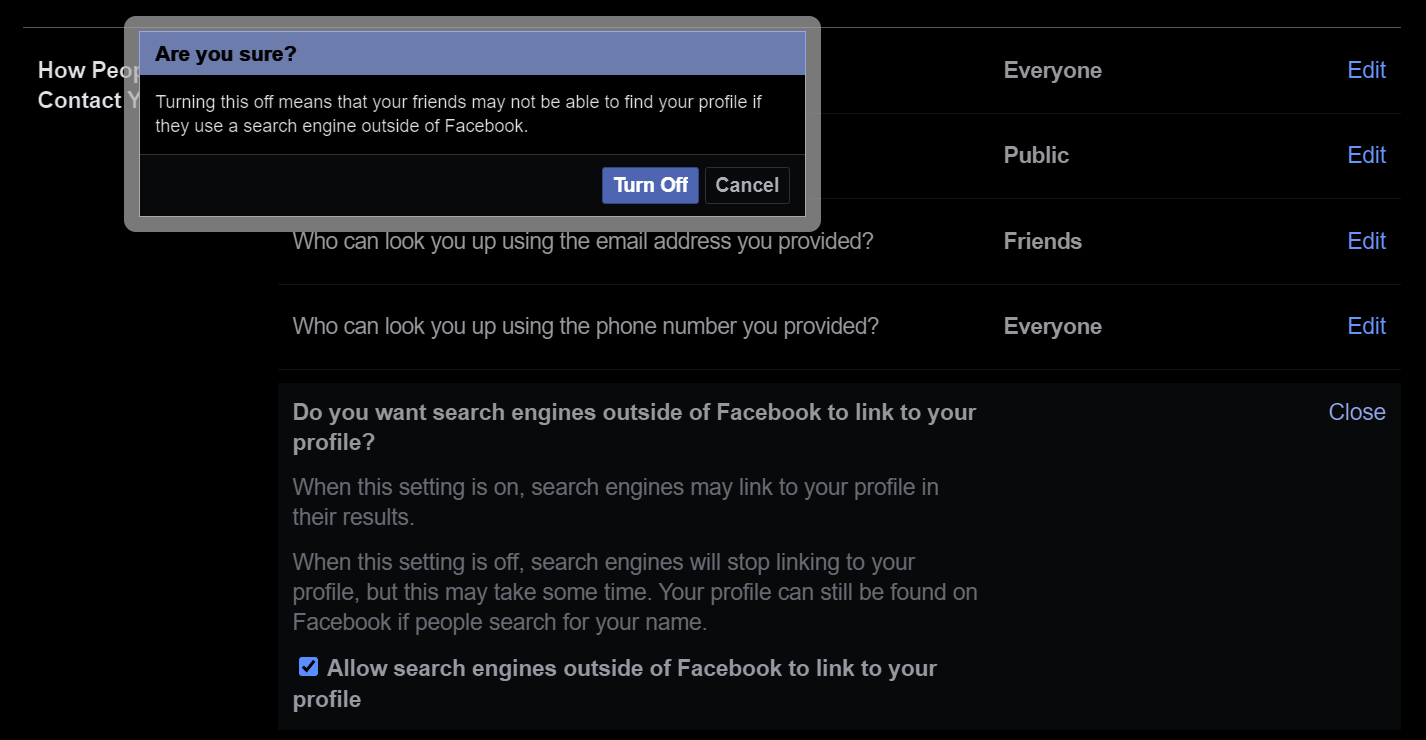 Finally, select the “Close” option to save your new preference. That’s it. Now, Facebook will prevent search engines outside of the social network from linking your profile in their results.
Note: This setting will take at least a few weeks to come into effect. Even after Facebook processes the request on its end, your information and profile link will continue to exist in search engines’ cache and will surface in search results. Once Facebook relays the updated preference to sites such as Google, Yahoo, and Bing, they will take some additional time to reflect the changes. In addition, while search engines will no longer be able to directly link your profile in results, they can crawl your publicly available information, like posts and your full name. Due to this loophole, anyone with the right keywords can still locate your Facebook profile through search engines. |
|
2951 Britannia crescent
Port Coquitlam BC, V3B 4V5 778-776-6222 Hours of operation Mon - Fri 9 a.m. - 6 p.m. Sat 11 a.m. - 5 p.m. (by appointment only) Sunday & Holidays - Closed |
Business Number 778569517BC0001 - © Copyright CompuBC, All Rights Reserved.
|