 Encrypting every bit of data on a Windows 10 PC is a crucial security precaution. Every edition of Windows 10 includes strong encryption options, with business editions having the best set of management tools. Here's a hands-on guide If your PC were lost or stolen, you'd probably cringe at the cost of replacing it. But that's nothing compared to what you'd stand to lose if someone had unfettered access to the data on that device. Even if they can't sign in using your Windows user account, a thief could boot from a removable device and browse the contents of the system drive with impunity. The most effective way to stop that nightmare scenario is to encrypt the entire device so that its contents are only available to you or someone with the recovery key. BitLocker is the brand name that Microsoft uses for the encryption tools available in business editions of Windows (desktop and server). A limited but still effective subset of BitLocker device encryption features are also available in Windows 10 Home editions. Here's how to make sure your data is protected. HOW DOES BITLOCKER WORK IN WINDOWS 10? On all devices that are designed for Windows 10 (see the following section for the hardware requirements), device encryption is automatically enabled. Windows Setup automatically creates the necessary partitions and initializes encryption on the operating system drive with a clear key. To complete the encryption process, you must perform one of the following steps:
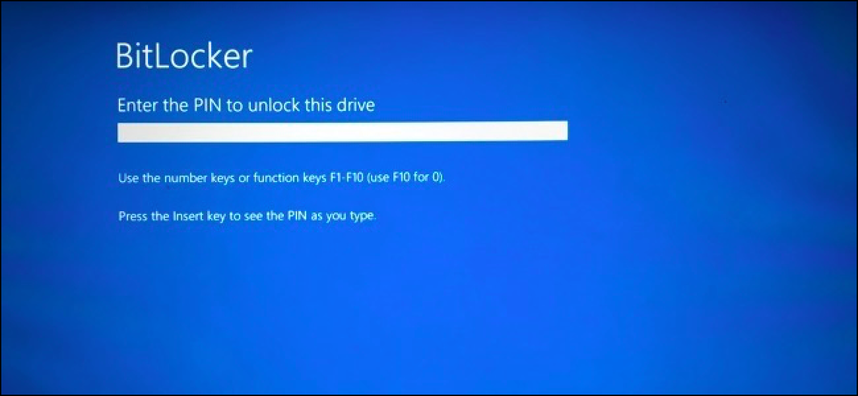 HARDWARE REQUIREMENTS The most important hardware feature required to support BitLocker Device Encryption is a Trusted Platform Module chip, or TPM. The device also needs to support the Modern Standby feature (formerly known as InstantGo). Virtually all devices that were originally manufactured for Windows 10 meet these requirements. MANAGING BITLOCKER For the most part, BitLocker is a set-it-and-forget-it feature. After you enable encryption for a drive, it doesn't require any maintenance. You can, however, use tools built into the operating system to perform a variety of management tasks. The simplest tools are available in the Windows graphical interface, but only if you are running Windows 10 Pro or Enterprise. Open File Explorer, right-click any drive icon, and click Manage BitLocker. That takes you to a page where you can turn BitLocker on or off; if BitLocker is already enabled for the system drive, you can suspend encryption temporarily or back up your recovery key from here. You can also manage encryption on removable drives and on secondary internal drives. 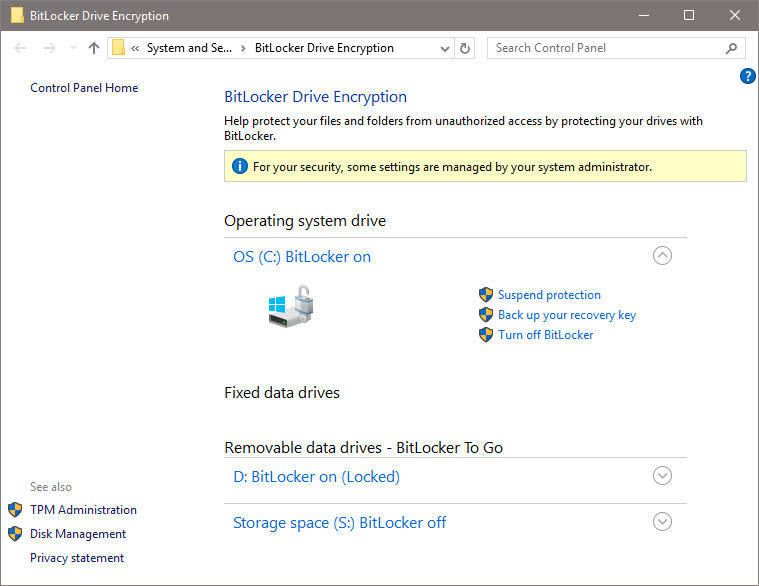 On a system running Windows 10 Home, you'll find an on-ff button under Settings > Update & Recovery > Device Encryption. A warning message will appear if device encryption hasn't been enabled by signing into a Microsoft account. For a much larger set of tools, open a command prompt and use one of the two built-in BitLocker administrative tools, manage-bde or repair-bde, with one of its available switches. The simplest and most useful of these is manage-bde -status, which displays the encryption status of all available drives. Note that this command works on all editions, including Windows 10 Home. SAVING AND USING A RECOVERY KEY Under normal circumstances, you unlock your drive automatically when you sign in to Windows 10 using an account that's authorized for that device. If you try to access the system in any other way, such as by booting from a Windows 10 Setup drive or a Linux-based USB boot drive, you'll be prompted for a recovery key to access the current drive. You might also see a prompt for a recovery key if a firmware update has changed the system in a way that the TPM doesn't recognize. As a system administrator in an organization, you can use a recovery key (manually or with the assistance of management software) to access data on any device that is owned by your organization, even if the user is no longer a part of the organization. The recovery key is a 48-digit number that unlocks the encrypted drive in those circumstances. Without that key, the data on the drive remains encrypted. If your goal is to reinstall Windows in preparation for recycling a device, you can skip entering the key and the old data will be completely unreadable after setup is complete. Your recovery key is stored in the cloud automatically if you enabled device encryption with a Microsoft account. To find the key, go to https://onedrive.com/recoverykey and sign in with the associated Microsoft account. (Note that this option works on a mobile phone.) Expand the listing for any device to see additional details and an option to delete the saved key. 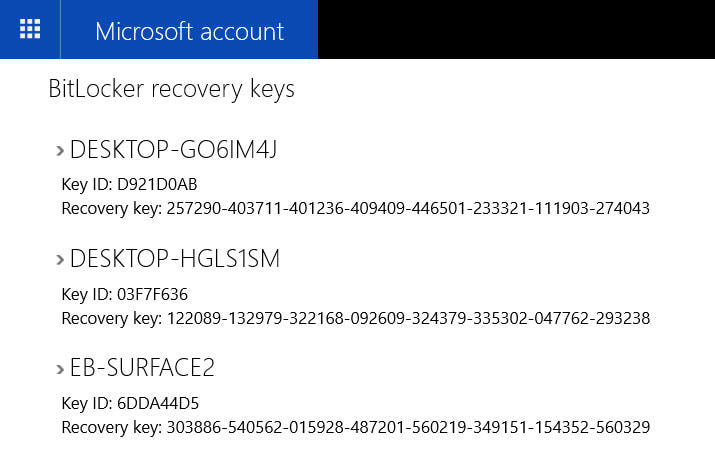 If you enabled BitLocker encryption by joining your Windows 10 device with an Azure AD account, you'll find the recovery key listed under your Azure AD profile. Go to Settings > Accounts > Your Info and click Manage My Account. If you're using a device that's not registered with Azure AD, go to https://account.activedirectory.windowsazure.com/profile and sign in with your Azure AD credentials. Find the device name under the Devices & Activity heading and click Get BitLocker Keys to view the recovery key for that device. Note that your organization must allow this feature for the information to be available to you. Finally, on business editions of Windows 10, you can print or save a copy of the recovery key and store the file or printout (or both) in a safe place. Use the management tools available in File Explorer to access these options. Use this option if you enabled device encryption with a Microsoft account and you prefer not to have the recovery key available in OneDrive BITLOCKER TO GO Removable storage devices need encryption too. That includes USB flash drives as well as MicroSD cards that can be used in some PCs. That's where BitLocker To Go works. To turn on BitLocker encryption for a removable drive, you must be running a business edition of Windows 10. You can unlock that device on a device running any edition, including Windows 10 Home. As part of the encryption process, you need to set a password that will be used to unlock the drive. You also need to save the recovery key for the drive. (It's not automatically saved to a cloud account.) 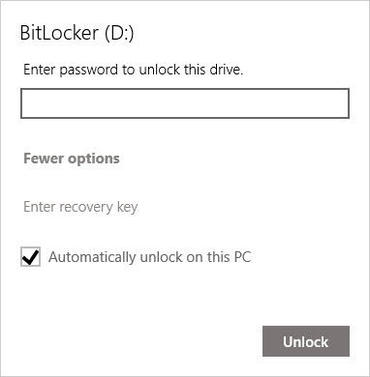 Finally, you need to choose an encryption mode. Use the New Encryption Mode (XTS-AES) option if you plan to use the device exclusively on Windows 10. Choose Compatible Mode for a drive you might want to open on a device running an earlier version of Windows. The next time you insert that device into a Windows PC, you'll be prompted for the password. Click More Options and select the checkbox to automatically unlock the device if you want easy access to its data on a trusted device that you control. That option is especially useful if you're using a MicroSD card for expanded storage capacity on a device such as a Surface Pro. After you sign in, all of your data is immediately available. If you lose the removable drive or it is stolen, its data is inaccessible to the thief. On a personal note
People like to feel protected and computer manufacturer like to enable the drive encryption out of the factory, it is all good and well until you have a problem with your Windows OS or a faulty hard drive. If you can't boot into Windows for any reason, OS related or hardware related, your IT support will need the encryption key in order to recover/repair your Windows OS or extract your important data from your drive. Without the encryption key it is impossible mission so, save your encryption key in a safe place away from your hard drive and log in with a Microsoft account and make sure the encryption key is saved on your account.
0 Comments
 Sometimes it’s obvious. That message from a Nigerian prince requesting you wire $2,000? Ok, probably not going to fall for that one. If the CEO of your company asks for your credit card information via email? Something is definitely off. But often phishing is harder to spot. Phishing is a common scheme in which someone poses as a trusted party (like a bank or government employee) in an attempt to steal personal information, such as credit card numbers, usernames, and email addresses. You might get an email that appears to be from Netflix, asking you to log in or your account will be terminated. It could come as a text from Best Buy offering you a gift card if you enter your account information. When it looks too good to be true, it probably is and if something just feels off—it’s worth taking a closer look. How can you avoid phishing? Phishing attempts will often include a false story meant to lure you into entering your sensitive information. Some common forms:
Things to watch out for High sense of urgency Hackers will often create a sense of urgency like threatening you with the loss of service. For instance, a phishing email from someone posing as a bank or another financial institution might ask for you to “confirm your account” and re-submit your payment information or else your account will be terminated. Don’t panic. If something seems strange or alarming, it’s worth taking a pause to investigate. No personalization Since cyber criminals often send hundreds of emails at a time, another clue that it may be a fake email is the lack of a personalized greeting. Proceed with caution if the email doesn’t include your name or username, or addresses you simply as “Customer” or “Account Holder.” Poor spelling/grammar One quick way to tell the difference between an official communication from a service you use and a phishing scam is the use of misspelled words and poor grammar in the body of the email. Actions you can take Check the sender’s email address Cyber criminals will often create an email account that closely resembles a company’s official email address. For instance, a phishing email address from Amazon might look like “[email protected]”. Notice the “A” in “Amazon” is not included in the email address. Hover your mouse over any link in an email Before clicking make sure the address looks right. When in doubt, do not click the link or open any attachments. If you think a website might be fake, check the URL and confirm it includes “https://” Similar to phishing emails, the URL of a fake website may look nearly identical to a legitimate website. Make sure to look out for any misspellings, unusual words or special characters before or after the company’s name. Look for “https://” not “http://” at the beginning of the address URL. Any legitimate entity asking for your payment info will have a secured website. To test whether you can spot a phishing scam, check out Google’s quiz.  |
|
2951 Britannia crescent
Port Coquitlam BC, V3B 4V5 778-776-6222 Hours of operation Mon - Fri 9 a.m. - 6 p.m. Sat 11 a.m. - 5 p.m. (by appointment only) Sunday & Holidays - Closed |
Business Number 778569517BC0001 - © Copyright CompuBC, All Rights Reserved.
|